
Parcels
This chapter shows how Terrace turns linework into numbered lots, cuts the road right of way through them, subdivides them by area or frontage, and writes the Philippine technical description of any lot. By the end you'll be able to lay out a subdivision along a road and hand the surveyor a lot data computation and a technical description ready for the plan.
Parcel sites and lots
Terrace keeps lots in a parcel site: a set of boundary lines, and every closed area those lines make. Each closed area is a parcel (a lot) with a number, a name, an area and a perimeter. Lines shared by two lots are kept once, so moving a corner changes both lots at the same time.
The sample project has one parcel site, San Roque Lots: a mother lot that the Teresa Bypass Road cuts through, the road's 20 m right of way (10 m each side of the centerline), and twelve lots of about 1,000 m² fronting the road on the south side. Open it with Help ▸ Open the Sample Project and look under Parcel Sites in the Project browser.
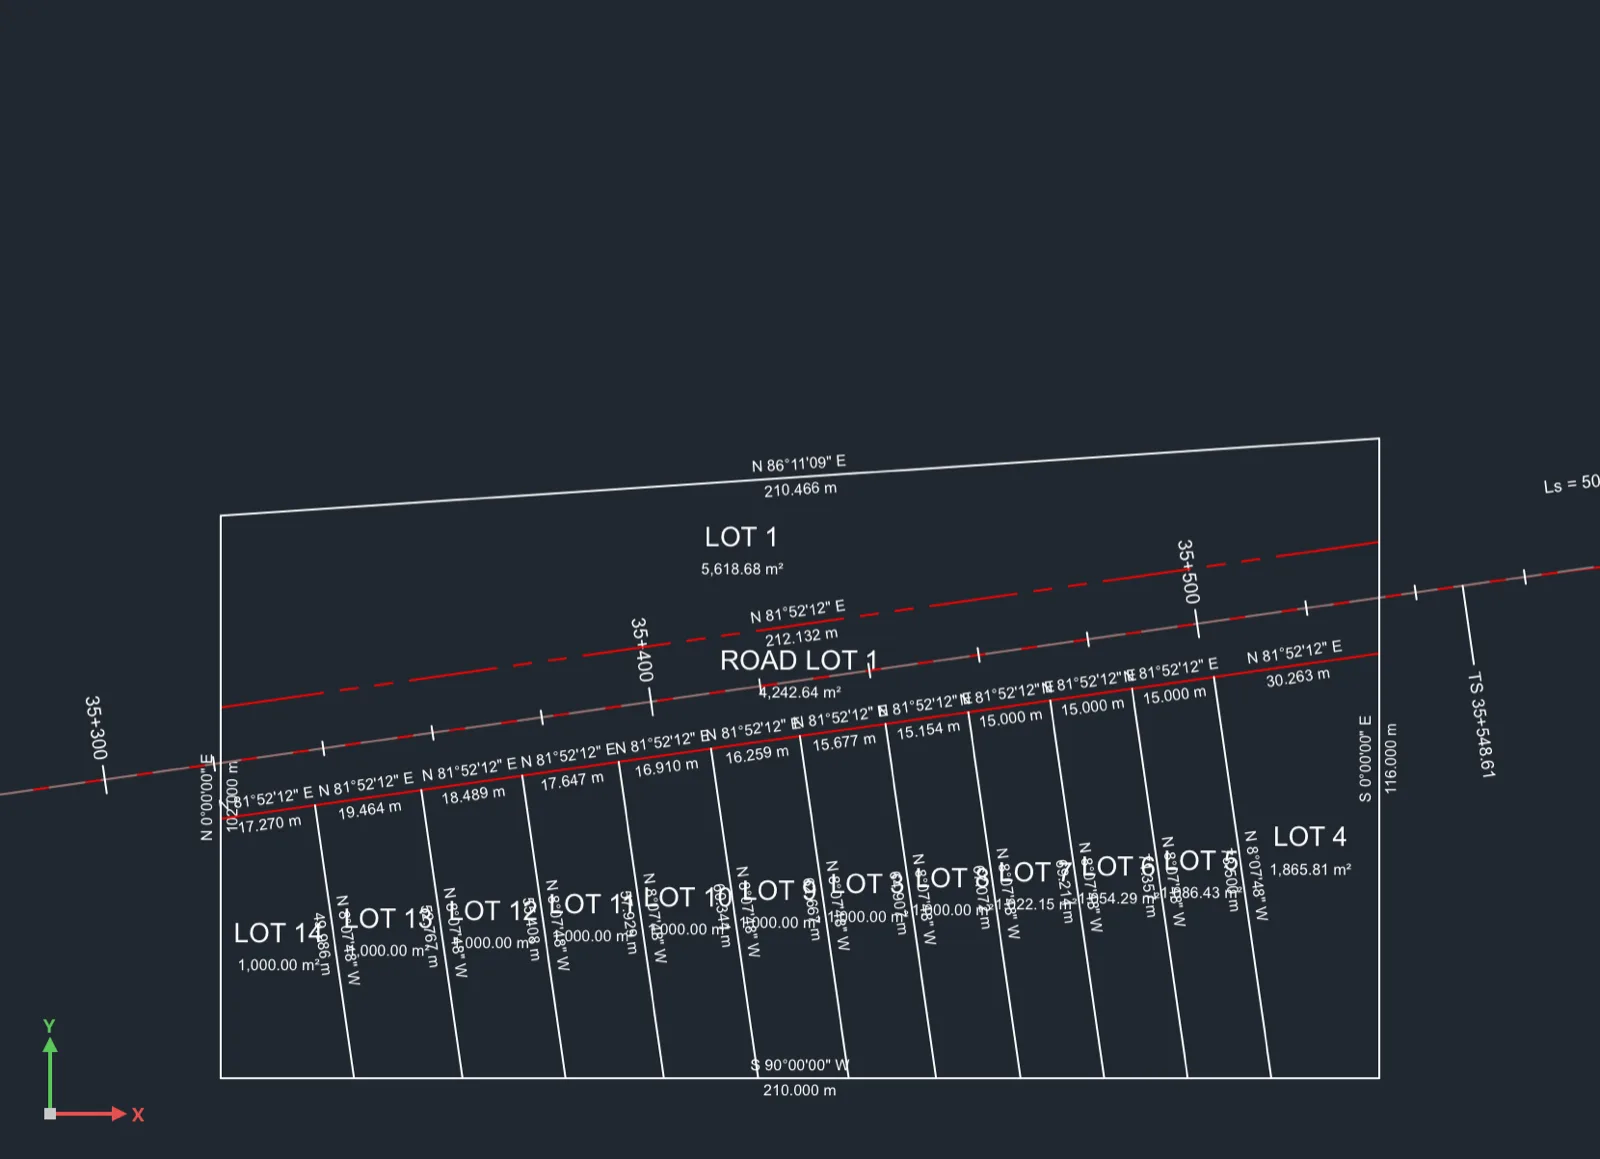
Each lot also has a kind: Lot, Road lot, Open space, Right of way or Easement. The road lot made by the right of way is kind Right of way, which is why it is named Road Lot 1.
All the parcel tools are on the Parcels ribbon tab:
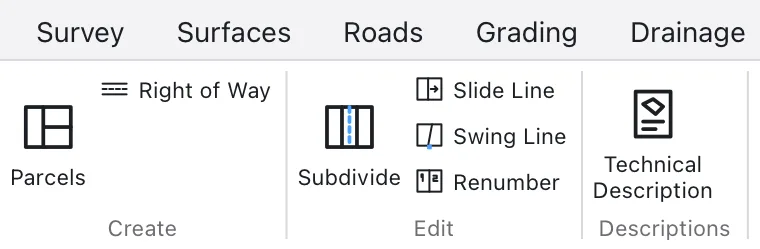
| Button | Command (aliases) | What it does |
|---|---|---|
| Parcels | CREATEPARCELS (PARCELS, LOTS) | Opens the Parcels from Polylines dialog (typed: makes parcels from the lines you pick) |
| Right of Way | RIGHTOFWAY (ROW) | Cuts the road right of way along an alignment through the lots |
| Subdivide | SUBDIVIDE (SUBDIV) | Splits a lot into lots of a given area or frontage |
| Slide Line | SLIDELINE (SLIDE) | Cuts off a lot of a given area with a line in a fixed direction |
| Swing Line | SWINGLINE (SWING) | Cuts off a lot of a given area with a line turning about a corner |
| Renumber | RENUMBERPARCELS (RENUMBER, RENUMLOTS) | Renumbers the lots along a path you draw |
| Technical Description | TECHDESC (TD, TECHNICALDESCRIPTION) | Writes the technical description of a lot |
The two quick parcel reports, AREATABLE and LOTDATA, are on the command line (see Area tables and lot data). Every command is one undo step. The full list is in the command reference.
Making lots from linework
Start here when you have the lot lines as drawing: a surveyed boundary you drew, a subdivision plan you imported from DWG, or polylines from a GIS file. Terrace finds every closed area the lines make, so you don't have to draw each lot as its own closed polyline: an outer boundary plus the lines between lots is enough.
- Draw the boundary as a closed polyline (
PLINE, close with C) and draw the lines between lots withLINEorPLINE. Lines may cross or end on the boundary; Terrace splits them where they meet. - Select the lines (a window around them is easiest).
- Click Parcels ▸ Parcels. The Parcels from Polylines dialog opens and says how many lines are selected.
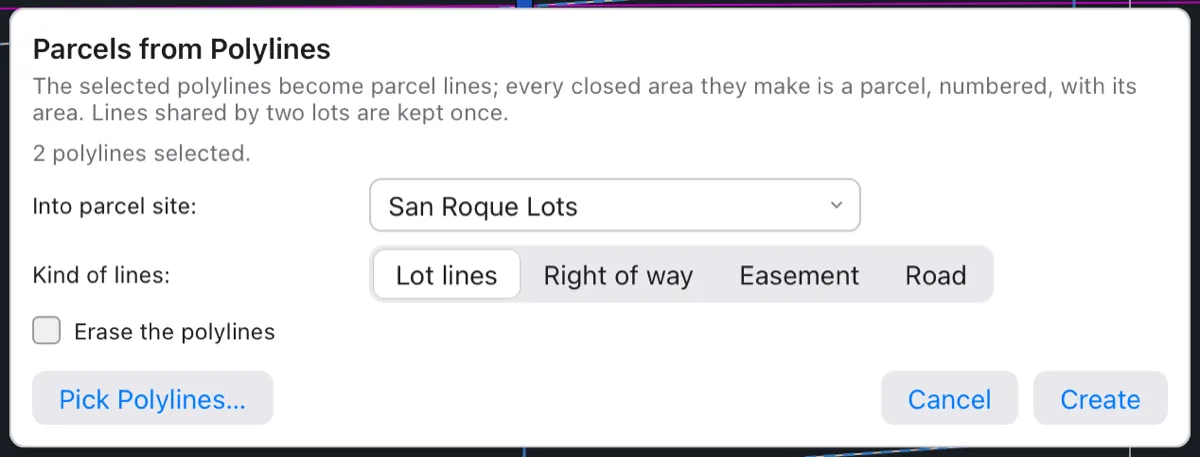
The Parcels from Polylines dialog with a rectangle and one lot line selected. - Check the fields:
- Into parcel site: the project's first site (here San Roque Lots), another site, or A new site. For a new site, give its name (Lots by default) and what Parcel names start with (Lot ).
- Kind of lines: Lot lines (the default), Right of way, Easement or Road. The kind decides the layer and line style the lines are drawn with.
- Erase the polylines: off by default, so your linework stays; tick it to remove it once the parcel lines are made.
- Click Create. The command line answers San Roque Lots: 2 new parcels (16 in all).
If nothing is selected when you open the dialog, it says so in orange and Create asks you to select the lot lines first. Close it, select, and click Parcels again — or click Pick Polylines…, which closes the dialog and starts CREATEPARCELS so you can pick them at the command line. The dialog takes lines and polylines (polyline bulges stay curved); to include arcs, use the command.
By the command line
- Type
CREATEPARCELS(PARCELS,LOTS). - At Select closed polylines and lot lines, pick the lines (a window around them is easiest) and press Enter. Polylines, lines and arcs are taken; arcs and polyline bulges stay curved. (This command starts at a Select objects prompt, so it has no Dialog option; open the dialog from the ribbon.)
- If the project already has a parcel site, Terrace asks Add to parcel site or [New] <San Roque Lots>. Press Enter to add to the site shown, type another site's name or click one of its lines, or type N for a new site. In a project with no parcel site, a new one called Site 1 is made without asking.
The command says what it made, for example 2 new parcels. San Roque Lots: 16 parcels, 31290.00 m² in all. New lots are numbered from the site's Next number and named with its prefix (Lot), so here they became Lot 15 and Lot 16. Each is 140 × 60 m = 4,200.00 m².
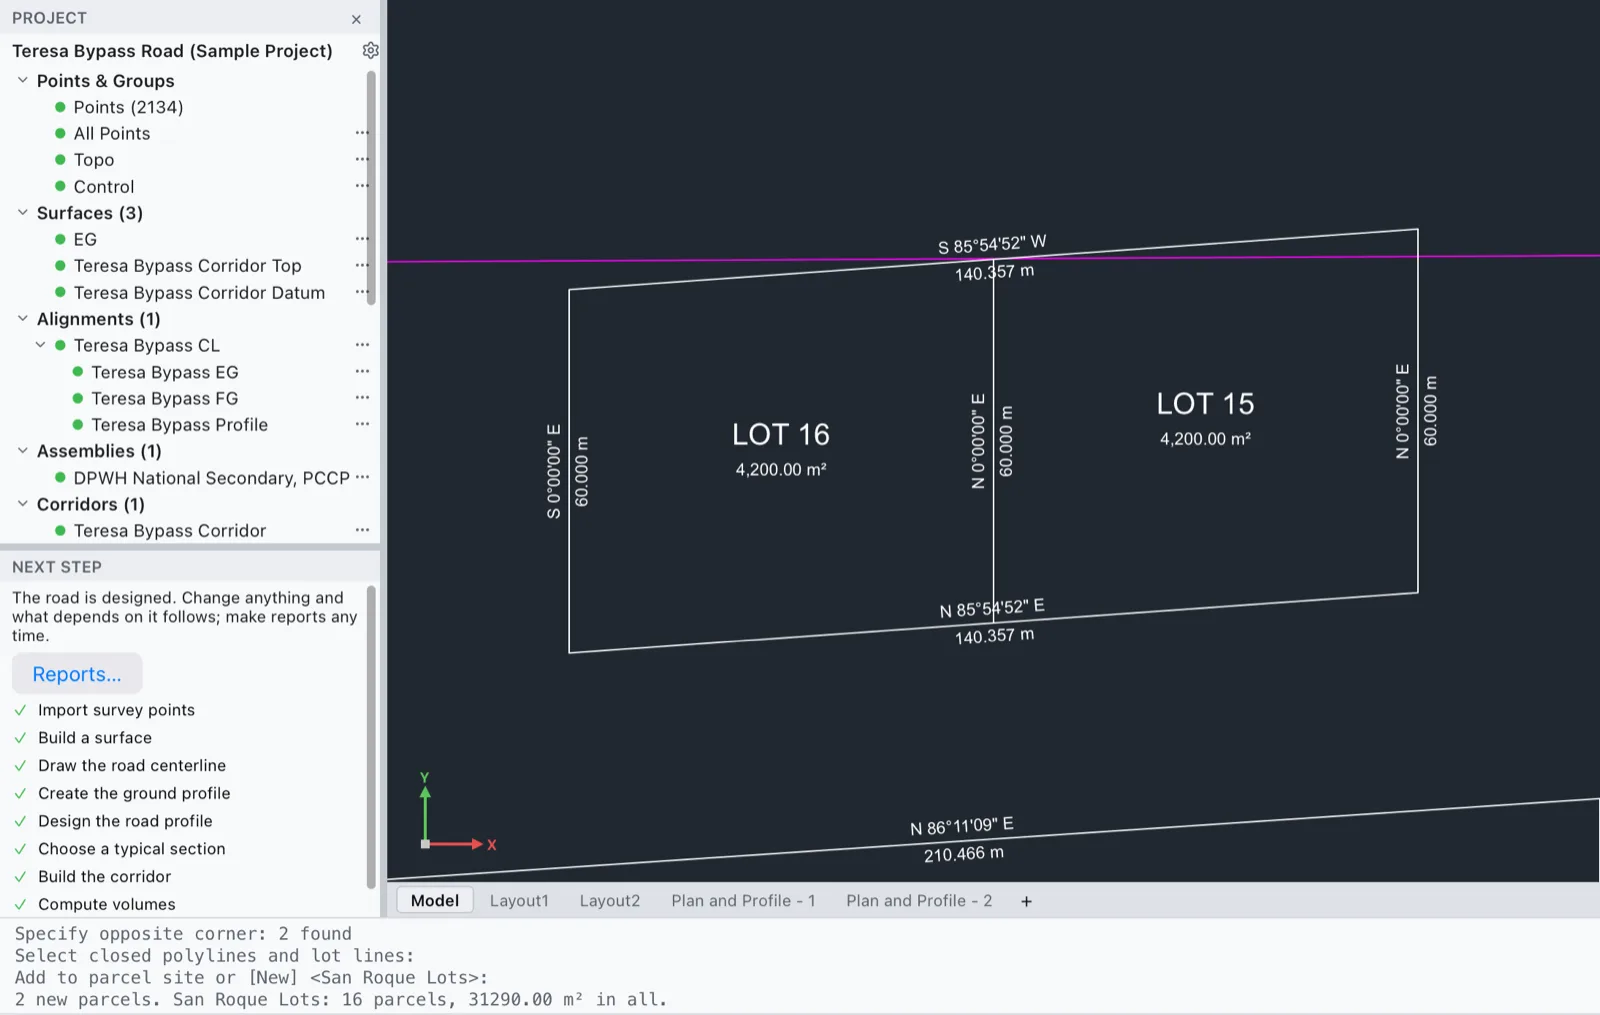
Note The polylines you picked stay in the drawing on their own layer; the parcel lines are drawn again by the parcel site. Erase or freeze the originals if you don't want them plotted, or tick Erase the polylines in the dialog.
A lot is only made where the lines close. A line that doesn't reach another line is still added to the site (it is drawn and labelled) but makes no lot until something closes it.
Cutting the road right of way
The right of way (ROW) is the strip of land the road needs. Once the road centerline exists as an alignment, Terrace can cut it through the lots for you: it offsets lines each side of the alignment for its whole length, clips them at the site's boundary, and finds the lots again. The strip between them becomes a road lot.
- Click Parcels ▸ Right of Way, or type
ROW. - Select the road centerline alignment: press Enter for the one shown (Terrace offers the selected alignment, or the only one), click it, or type its name.
- Right of way width left of the centerline <10.000>: type the width in metres, or press Enter.
- Right of way width right of the centerline: the left width is offered; press Enter for a symmetric ROW.
- If the project has more than one parcel site, pick the Parcel site to cut. With one site (or none, when a new one is made) this question is skipped.
Terrace answers with something like Right of way along Teresa Bypass CL: 10.00 m left, 10.00 m right. San Roque Lots: 14 parcels, 22890.00 m² in all. The widths you typed are remembered for next time. A 20 m ROW (10 m each side) is typical for a DPWH national secondary road; widen it where your road class asks for more.
The right of way stays linked to the alignment. Run RIGHTOFWAY again with other widths and the old ROW lines from that alignment are replaced, not added to. Move a PI of the alignment and the ROW is rebuilt along the new centerline with the same widths when the project updates.
Subdividing a lot
Three tools split a lot. All three start by asking you to Click inside the parcel to subdivide; Terrace answers with the lot's name and area (Lot 1: 5618.68 m²) so you know you picked the right one.
Slide line: an area, a direction
Use a slide line when the dividing line must keep a direction, for example parallel to a side line, and you want an exact area. Terrace slides a line of that direction across the lot until it cuts off the area you asked for.
- Click Parcels ▸ Slide Line, or type
SLIDE, and click inside the lot. - Area of the new lot (m²): type the area. Half the lot is offered the first time; after that, the last area you used. The area must be less than the lot's.
- Direction of the line (angle or bearing, or two points): type an angle (90 is due north, measured counterclockwise from east as in the rest of the drawing) or click two points along an existing line to copy its direction.
- Click on the side of the parcel the new lot starts from: click near the end of the lot the new piece should come from.
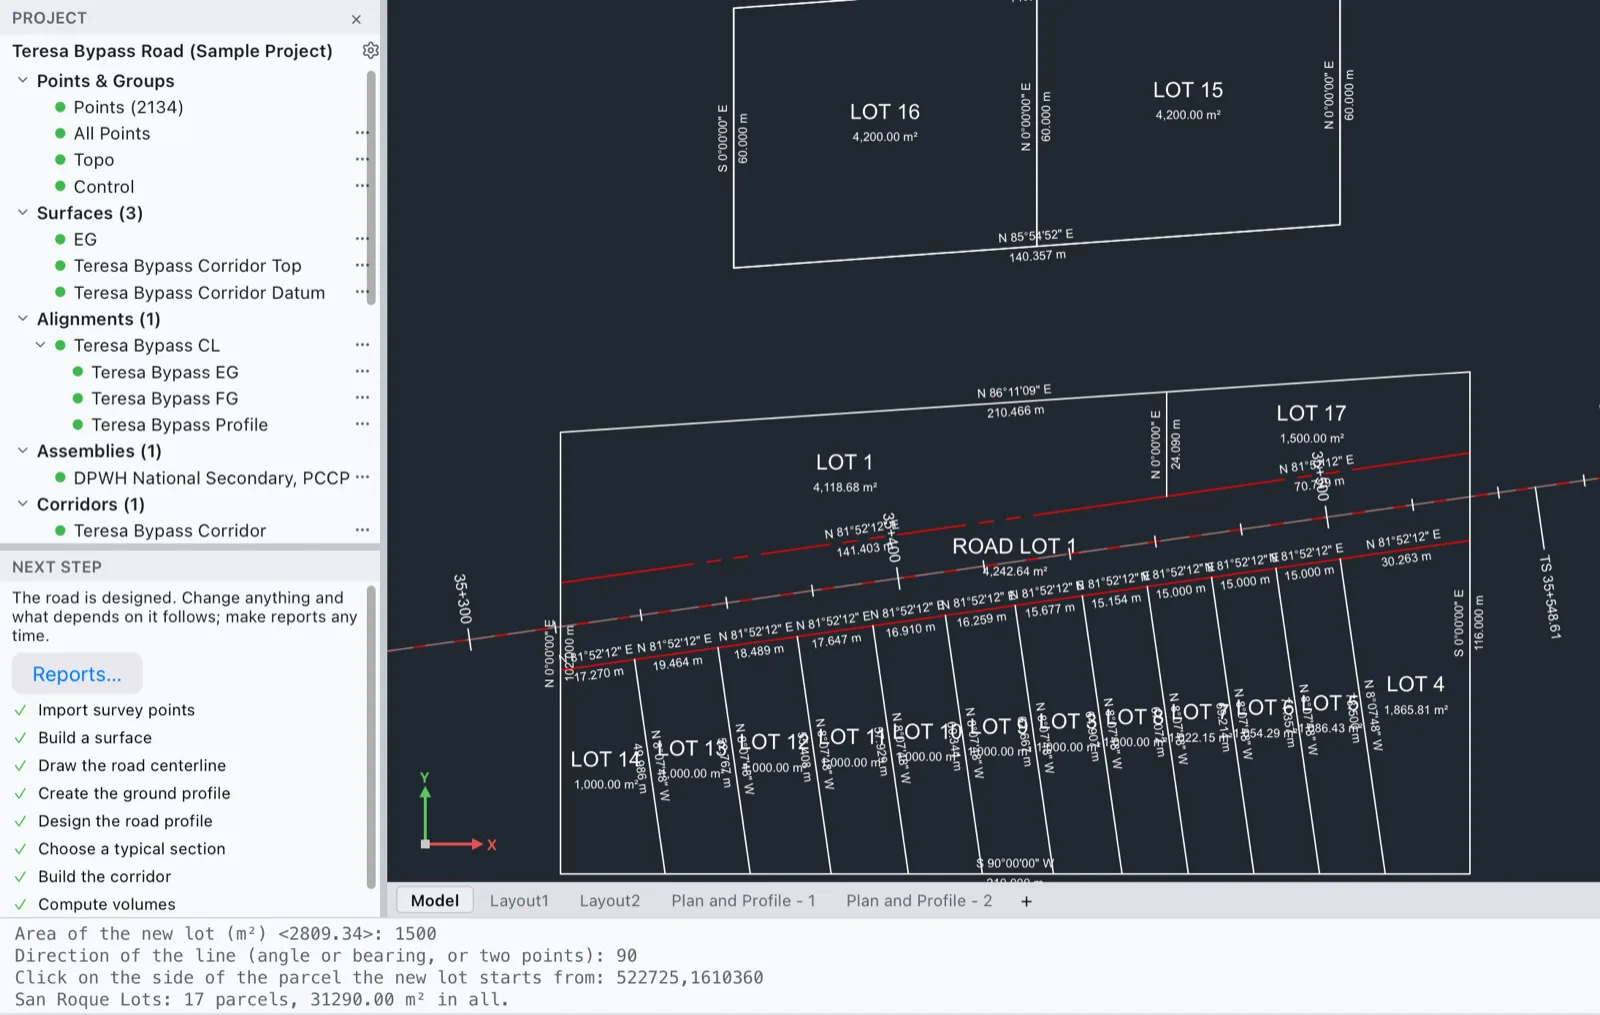
In the sample, slicing 1,500 m² off the east end of Lot 1 with a north–south line gives a new lot of exactly 1,500.00 m² and leaves the rest of Lot 1 as another lot. If no line in that direction can cut off the area, Terrace says so and changes nothing.
Swing line: an area, a pivot
Use a swing line when the dividing line must start at a corner, for example a lot that must keep the whole corner of a block. The line turns about the pivot until the area is reached.
- Click Parcels ▸ Swing Line, or type
SWING, and click inside the lot. - Area of the new lot (m²): type the area.
- Specify the pivot point (a corner): snap to the corner.
- Specify the point the line starts toward (along the frontage): click a point along the side the new lot fronts, going away from the pivot. The line starts there and turns counterclockwise; the piece on its right grows until it has the area.
If no line through the pivot cuts off that area, you get No line through that point cuts off … m² and the lot is left as it was.
Subdivide: many lots by area or by frontage
SUBDIVIDE splits a whole lot into a row of lots along its frontage (the side that faces the road), with dividing lines square to the frontage. This is how the sample's twelve 1,000 m² lots were made.
- Click Parcels ▸ Subdivide, or type
SUBDIV, and click inside the lot. - Subdivide by [Area/Frontage] <Area>: press Enter or type A for lots of a given area, or F for lots of a given frontage width.
- By area: Area of each lot (m²) <300.00>, then Minimum frontage <10.000>. A lot whose frontage would come out narrower than the minimum is widened to it (and takes more area).
- By frontage: Frontage of each lot <15.000>. Each lot gets that width along the frontage.
- Click near the frontage line (the lots run from its first corner): click close to the side the lots face. Terrace takes the nearest side of the lot.
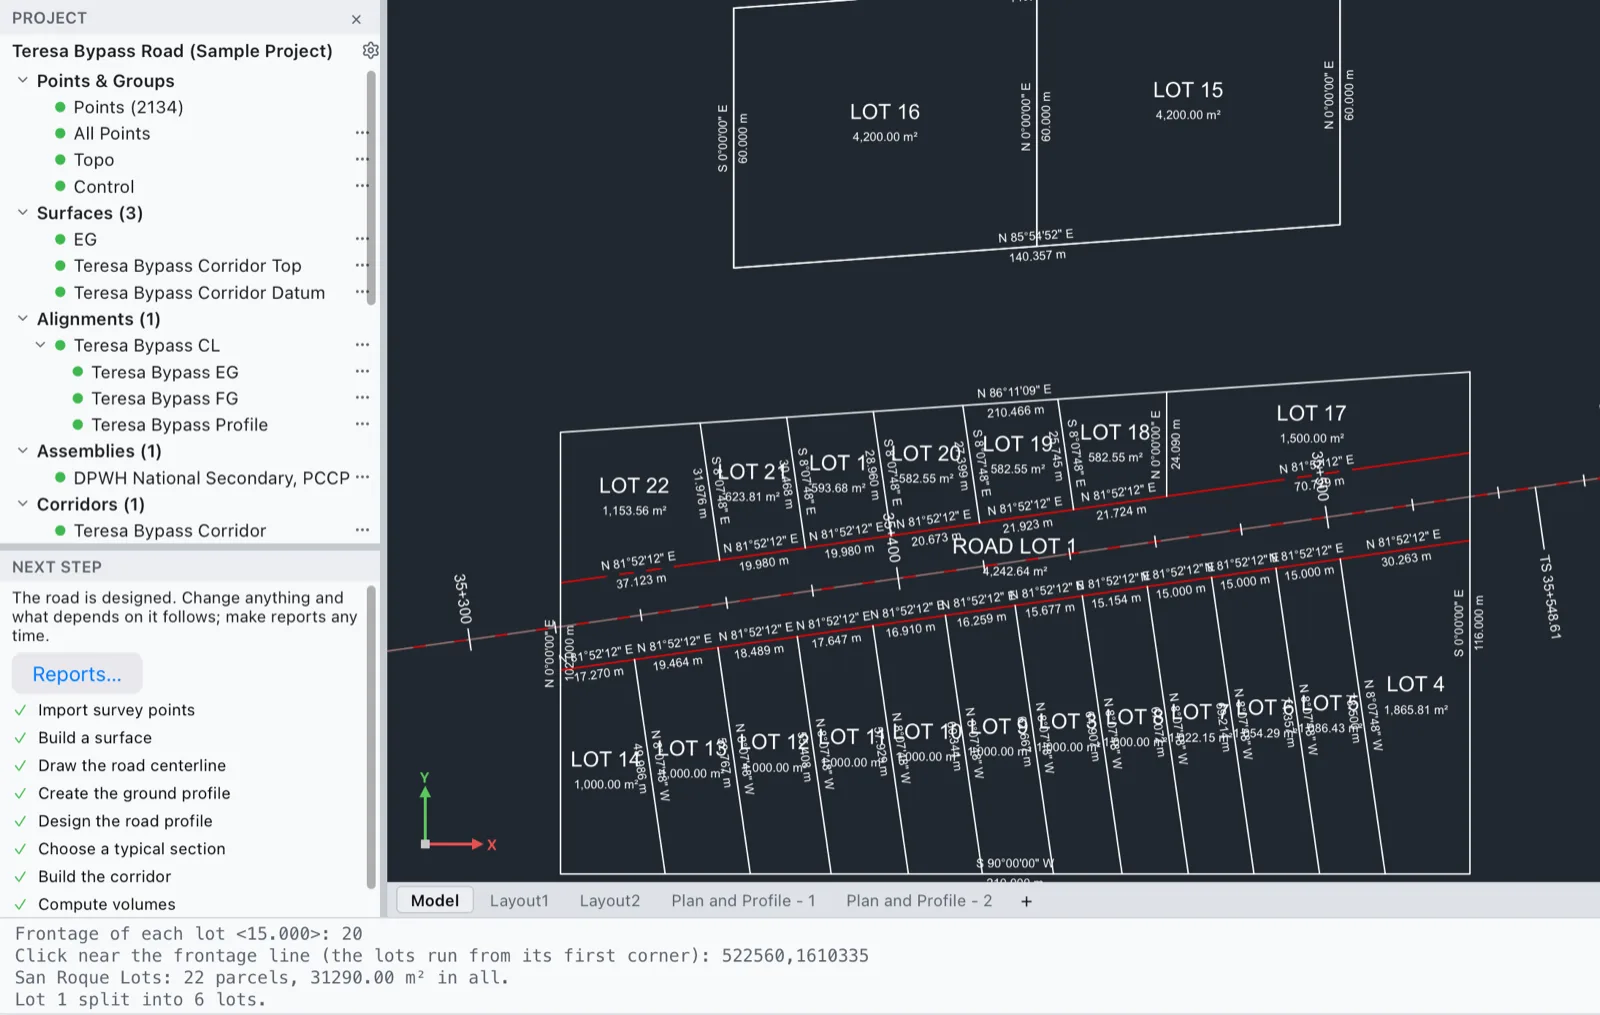
The lots run from one end of the frontage to the other; the last lot takes what is left, so it is never smaller than the others. The command line ends with, for example, Lot 1 split into 6 lots. If the frontage is shorter than one lot, or the lot is too small for one lot of the area, Terrace says so and changes nothing.
Area, frontage and minimum frontage are remembered, as is your choice of Area or Frontage.
Tip For blocks that aren't rectangles, subdivide by area: by frontage, each lot's area is the block's area shared out by frontage length, which is exact only for rectangular blocks.
Renumbering lots
New lots take the next free numbers, so after a few subdivisions the numbers jump around. RENUMBERPARCELS gives the lots along a path consecutive numbers in the order the path meets them, the way you'd number lots along a street.
- Click Parcels ▸ Renumber, or type
RENUMBER. - Select parcel site: press Enter for the site shown, or pick one.
- Starting number <1>: type the first number.
- Click the start of the path, then the next points through the lots (a preview line follows the cursor). Press Enter to finish.
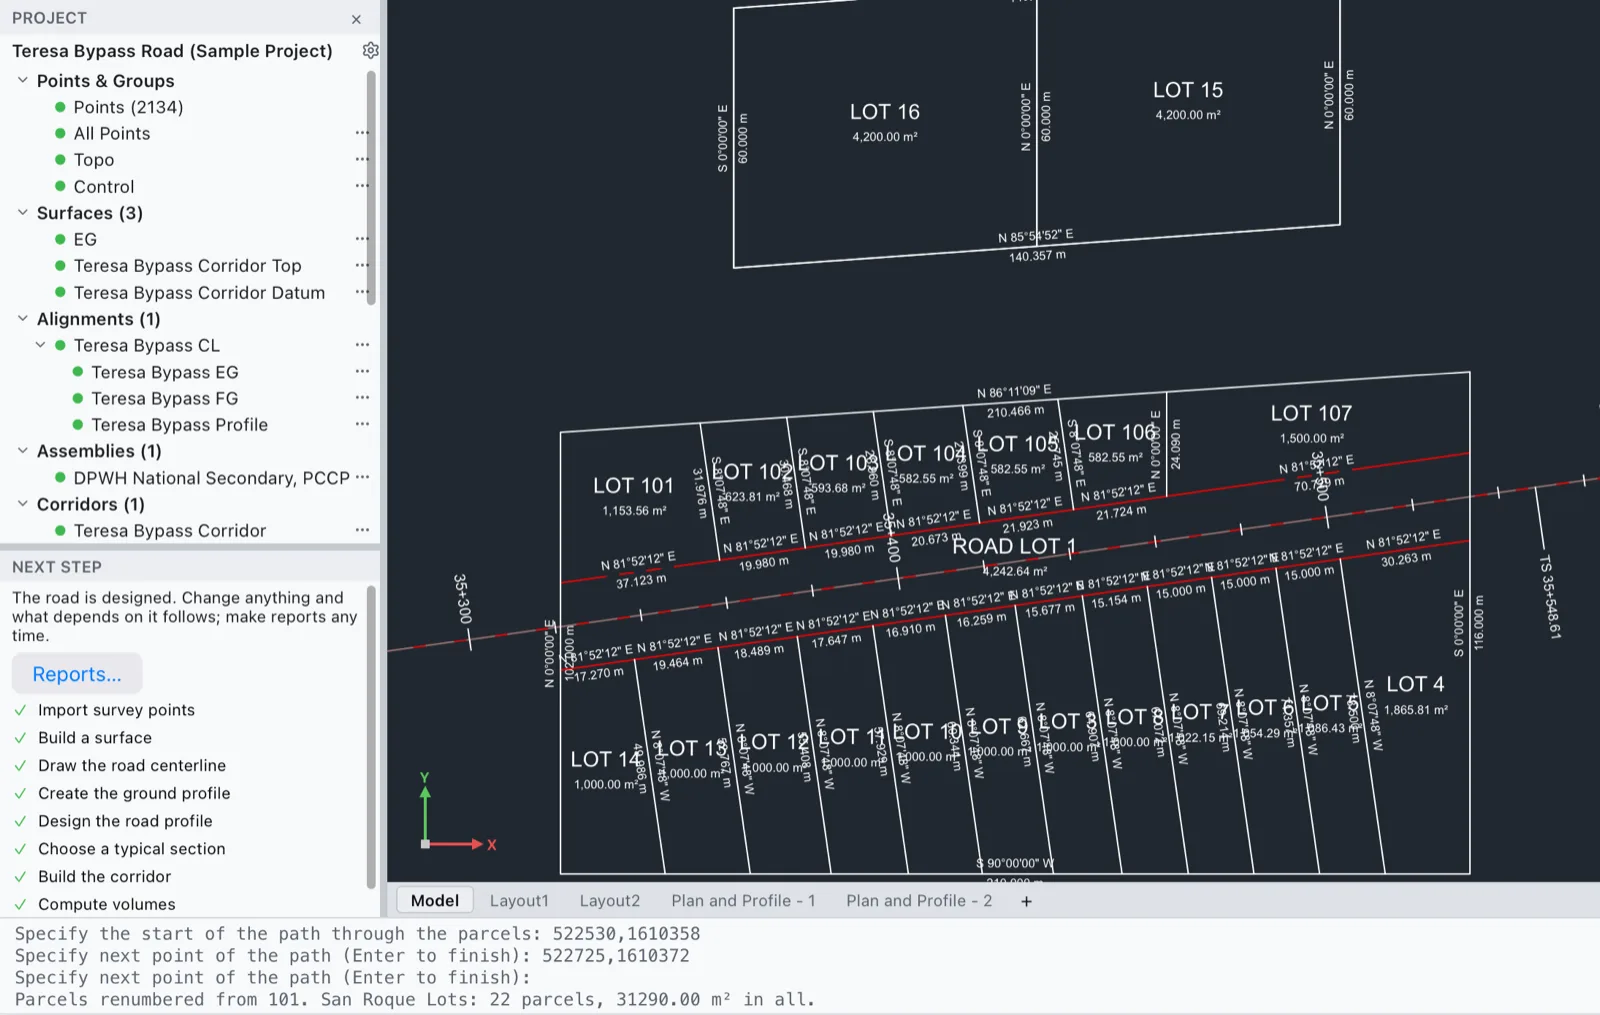
Lots the path passes through are numbered from the starting number; lots named "Lot n" are renamed to their new number, and lots with names of their own keep them. Lots the path misses keep their numbers.
Watch out Terrace doesn't check that the new numbers are free. Pick a starting number that doesn't clash with lots outside the path.
Lot and site properties
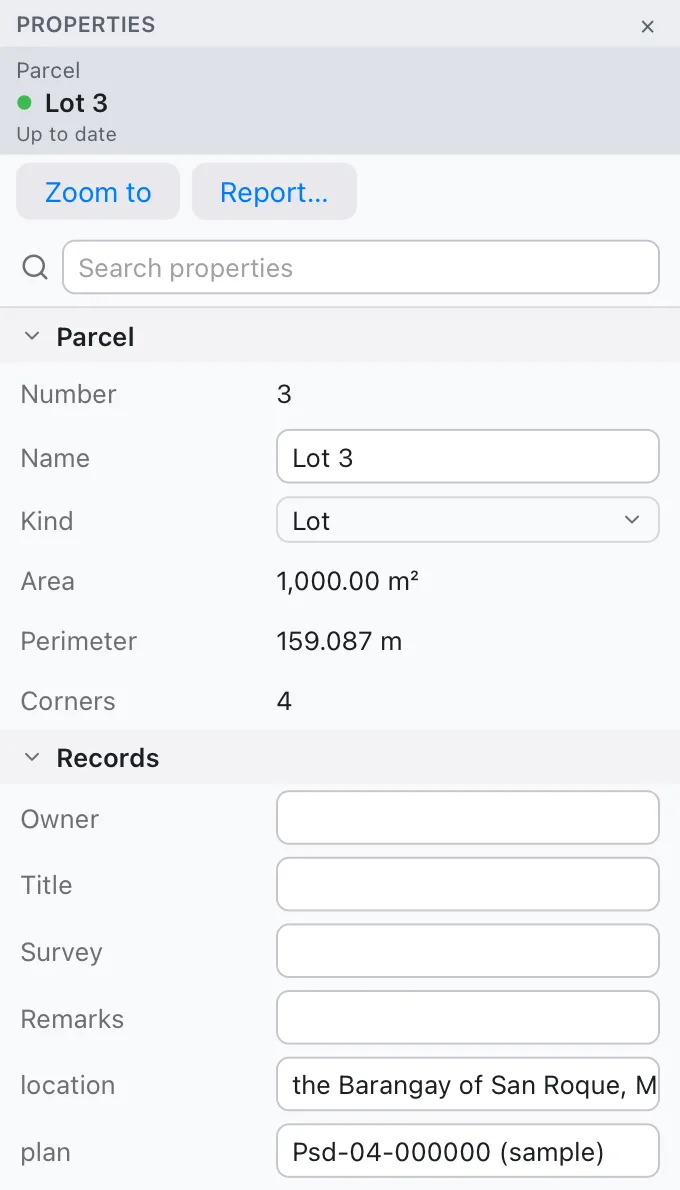
Click a lot's name under Parcel Sites in the Project browser (open the site with its arrow), or click the lot in the plan, and the Properties panel shows it:
| Group | Field | What it is |
|---|---|---|
| Parcel | Number | The lot number (change it with Renumber) |
| Name | The label on the plan and in reports | |
| Kind | Lot, Road lot, Open space, Right of way or Easement | |
| Area | In the project's area unit and decimals | |
| Perimeter | Total length of its sides | |
| Corners | Number of corners | |
| Records | Owner, Title, Survey, Remarks | Free text kept with the lot: the registered owner, the TCT/OCT number, the survey number, notes |
| Other recorded fields | Any other fields the lot carries, such as location and plan on the sample's lots, which the technical description uses |
Click the site itself (San Roque Lots) to see the site's own fields:
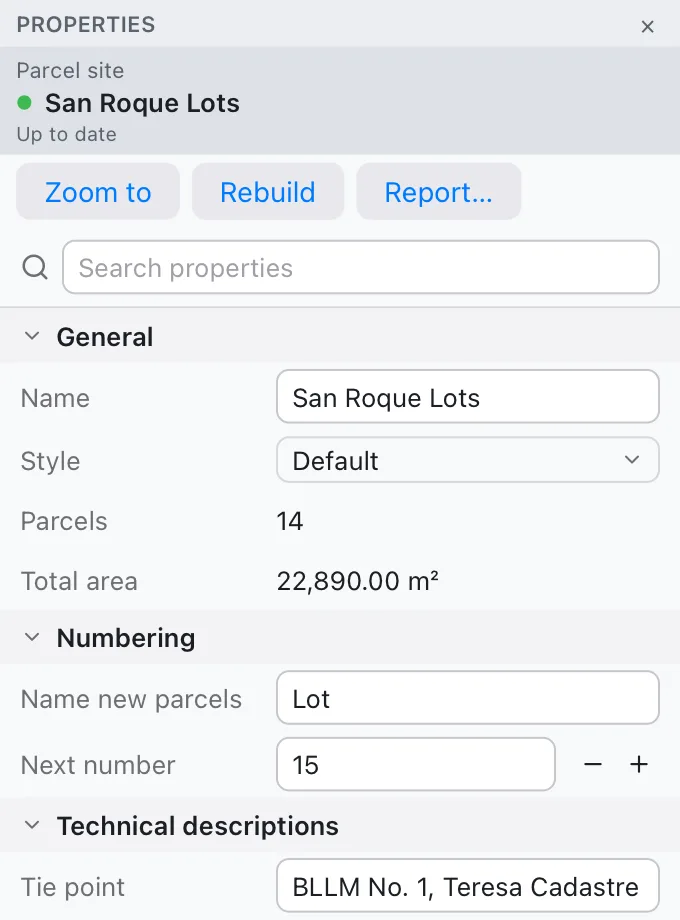
- Name and Style (see Labels below).
- Parcels and Total area, for checking.
- Name new parcels: the text before the number of new lots; "Lot " gives Lot 1, Lot 2…
- Next number: the number the next new lot gets.
- Tie point: the name of the monument the technical descriptions start from, such as BLLM No. 1 (a BLLM is a Bureau of Lands Location Monument).
Every change is one undo step. The Report… button opens the Reports dialog on the site.
Note The tie line in a technical description needs the tie monument as a COGO point. The sample's site is tied to point 1 (BLLM No. 1); the Properties panel only changes the monument's name, not which point it is, so a site you make in the app is described without a tie line for now.
Labels, corner numbers and the area table
A parcel site draws its lines by kind (lot lines, right of way and road lines on C-PROP-RWAY, easements on C-PROP-ESMT), each line's bearing above it and distance below it, reading upright, curves with their radius R and length L, and each lot's name and area at its centre. Its Style chooses what else is shown:
- Standard (and the sample's Default): line labels and lot labels.
- Survey Plan: adds corner numbers inside each lot (1, 2, 3… as in a lot data computation) and a PARCEL AREAS table beside the site listing every lot with its area and perimeter, on layer
C-PROP-TABL.
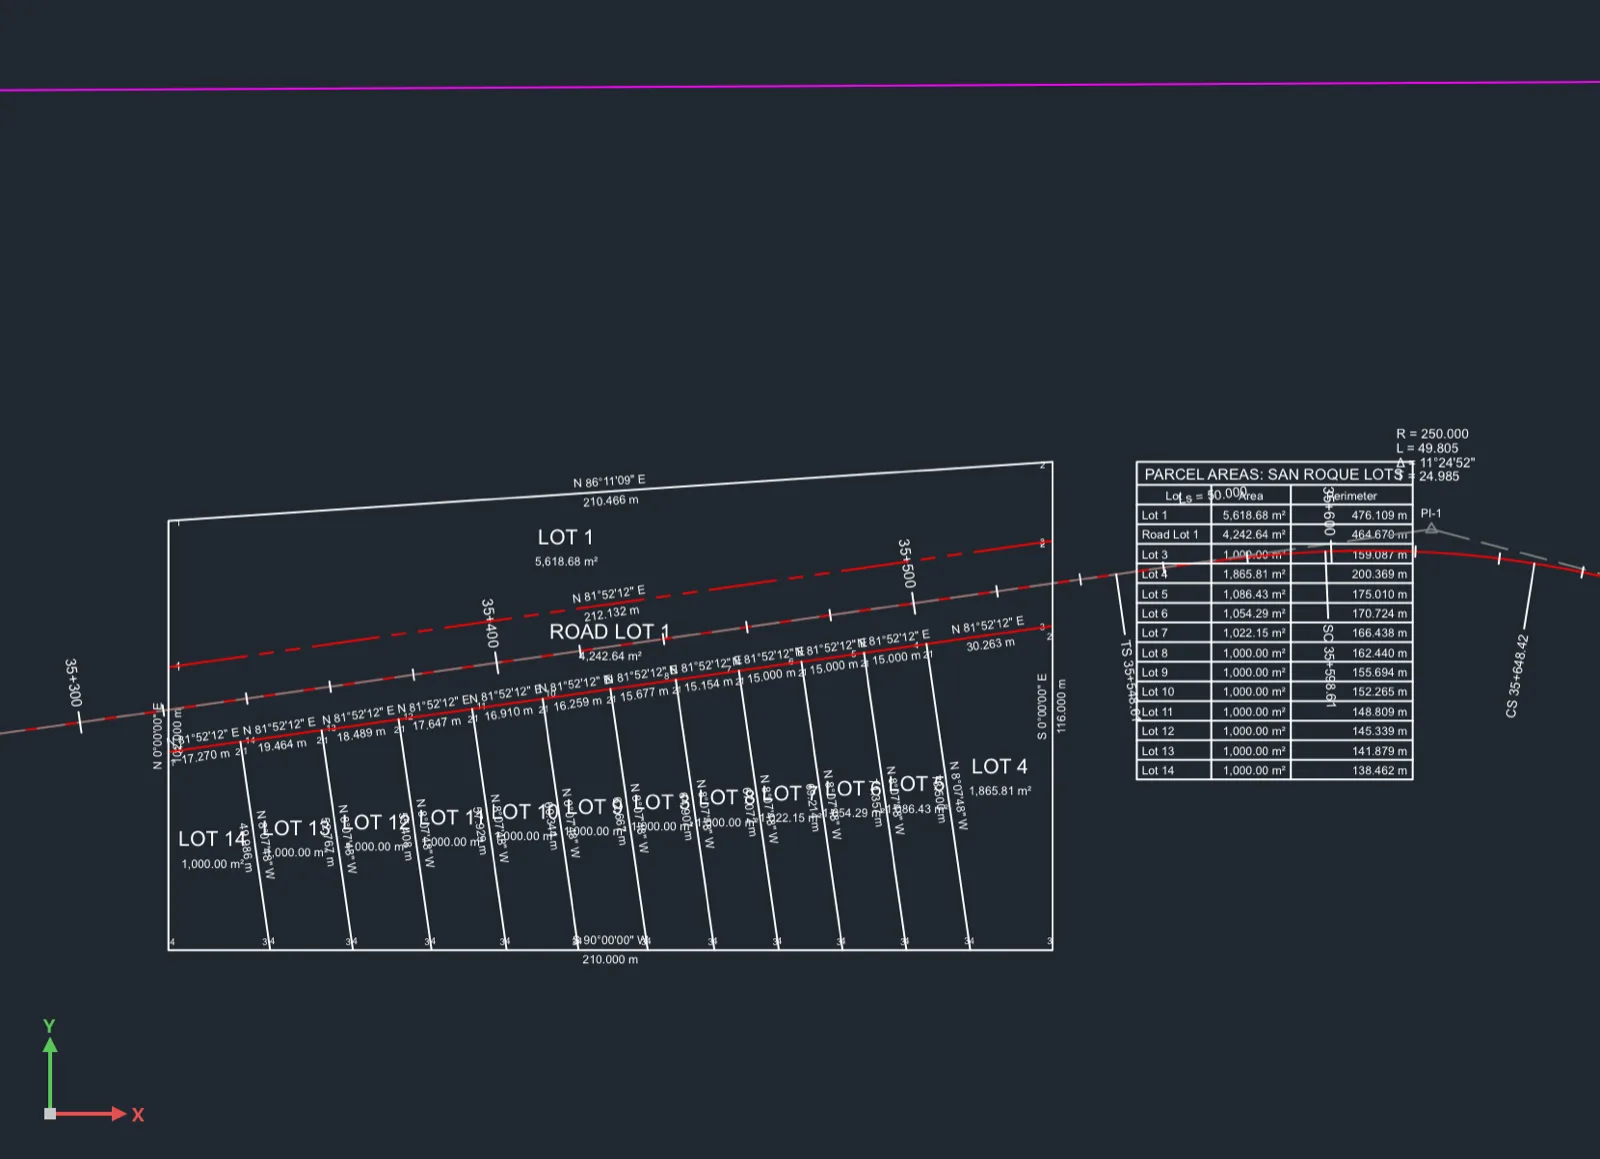
To change the style, pick it from Style in the site's Properties. Text heights, which labels show and where the area table goes are style settings; see Standards and styles.
Technical descriptions
A technical description is the paragraph on a title or an approved plan that defines a lot in words: where it is, what bounds it, the tie line from a monument to corner 1, every course as a bearing and a distance, and the area in words. Terrace writes it in the Philippine (DENR / LMB) form, with bearings written as on titles: N. 08 deg. 14' W., lines within 5° of a cardinal direction as Due North, Due West, and the area in words and figures.
- Click Parcels ▸ Technical Description, or type
TD. - Click inside the lot.
The description is printed on the command line and the Reports dialog opens. To see it there, save it as a PDF or copy it, pick Parcels ▸ Technical description in the dialog's list and type the lot's number in Lot number.
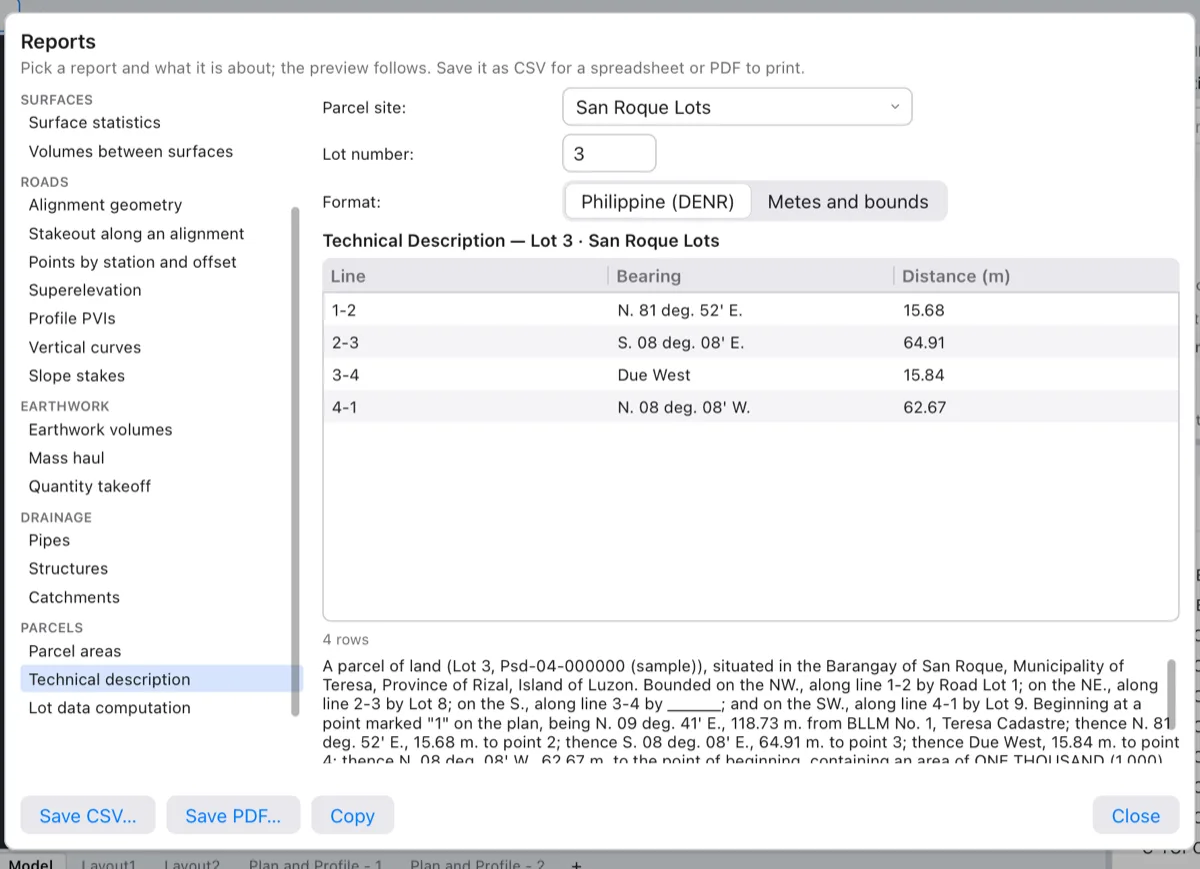
Here is the description of the sample's Lot 3, exactly as Terrace writes it:
A parcel of land (Lot 3, Psd-04-000000 (sample)), situated in the Barangay of San Roque, Municipality of Teresa, Province of Rizal, Island of Luzon. Bounded on the NW., along line 1-2 by Road Lot 1; on the NE., along line 2-3 by Lot 8; on the S., along line 3-4 by ______; and on the SW., along line 4-1 by Lot 9. Beginning at a point marked "1" on the plan, being N. 09 deg. 41' E., 118.73 m. from BLLM No. 1, Teresa Cadastre; thence N. 81 deg. 52' E., 15.68 m. to point 2; thence S. 08 deg. 08' E., 64.91 m. to point 3; thence Due West, 15.84 m. to point 4; thence N. 08 deg. 08' W., 62.67 m. to the point of beginning, containing an area of ONE THOUSAND (1,000) SQUARE METERS, more or less. All points referred to are indicated on the plan and are marked on the ground by P.S. cyl. conc. mons. 15x40 cm.; Bearings: TRUE.
How each part is filled in:
- The words in the parentheses: the lot's name and its plan record (the plan number, such as a Psd number).
- Situated in: the lot's location record, else the location in Project Settings.
- Bounded by: each side reads the name of the lot on the other side of it (Road Lot 1, Lot 8). A side with nothing beyond it is left as a blank, ______, for you to fill in with the adjoining owner or cadastral lot.
- Beginning at: corner 1 is the lot's northwesternmost corner, and the corners run clockwise. The tie line runs from the site's tie monument to corner 1.
- Courses: bearings to the minute and distances to the centimetre, as they are written on titles. Curved sides are described by their chords.
- Area: rounded to the whole square metre, in words and figures.
- Monuments and bearings: P.S. cyl. conc. mons. 15x40 cm., Bearings: TRUE, unless the lot records say otherwise.
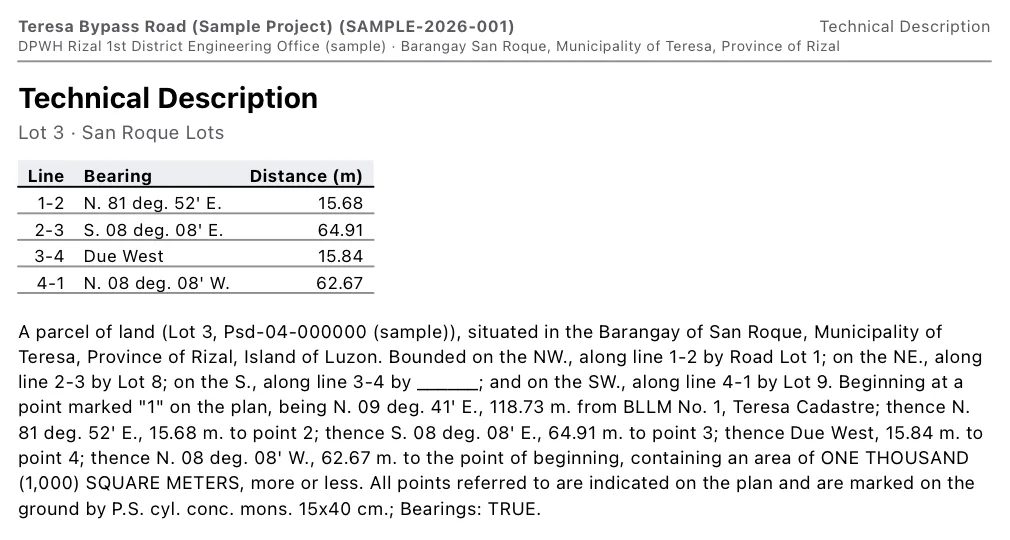
Use Save PDF… for a page you can print and attach, or Copy to paste the text into your own document:
Note The dialog's Format also offers Metes and bounds (the US style), but for now it gives the Philippine text too.
Area tables, lot data computation and closure
Two reports check the lots before they go on a plan. Both are in the Reports dialog under Parcels, and each has a command that prints it on the command line:
- Parcel areas (
AREATABLE, aliasPARCELREPORT; pick the site): number, name, kind, area and perimeter of every lot, with the total. On the sample: Lot 1 5,618.68 m², Road Lot 1 4,242.64 m², Lot 3 1,000.00 m² … total 22,890.00 m². - Lot data computation (
LOTDATA, aliasLDC; click inside the lot): the tie line and every course with its bearing, distance, latitude (north–south component) and departure (east–west component), the coordinates of each corner carried from the tie monument, and the closure.
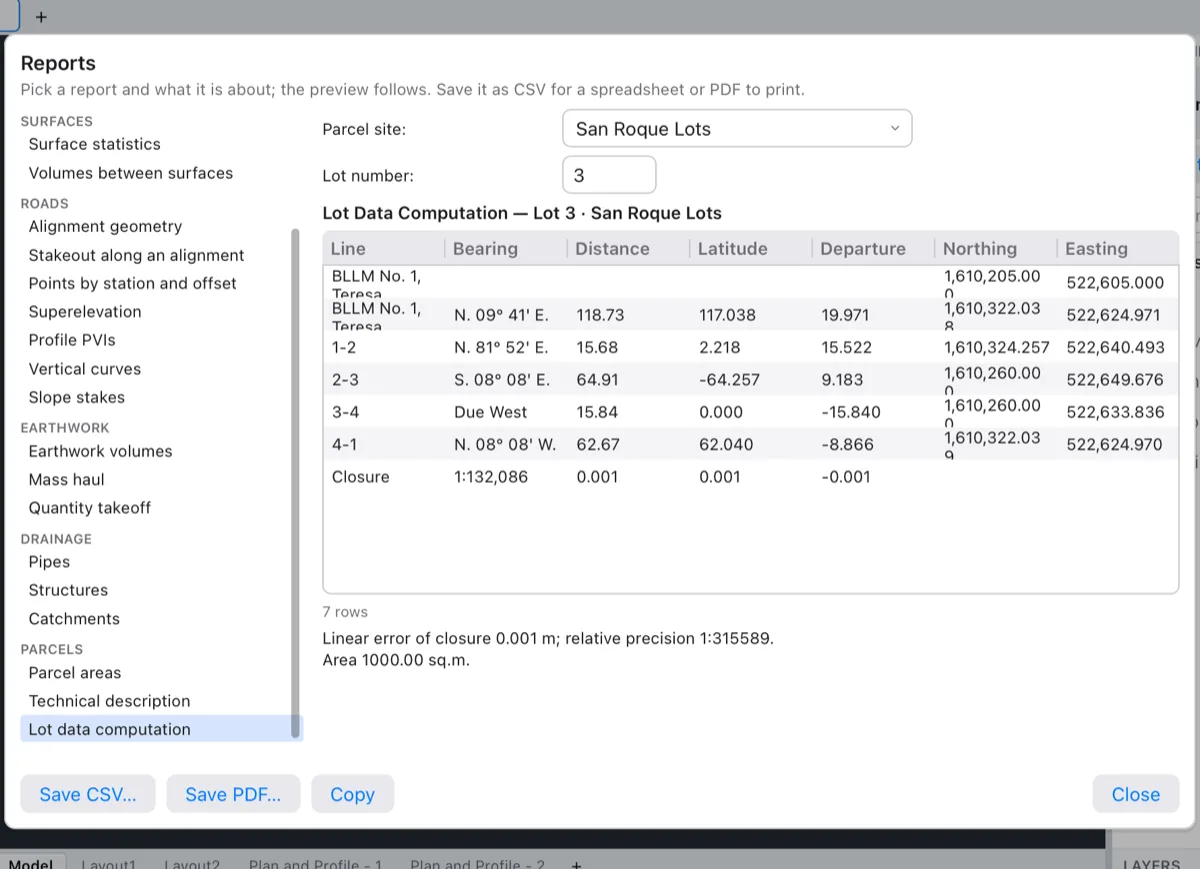
The closure tells you whether the courses, as they will be written (bearings to the minute, distances to the centimetre), close back on corner 1. The Closure row gives the relative precision (1:132,086 for Lot 3), the linear error and the sums of latitudes and departures; the note under the table gives the error from the courses at the project's own decimals. Rounding alone gives errors of a few millimetres; a large error means a line in the site doesn't meet its neighbour.
When you run LOTDATA or AREATABLE, the report is printed on the command line and the Reports dialog opens; pick the report in its list to save it. See Reports for saving CSV and PDF.