
Importing and exporting
This chapter shows how to bring data from other programs into a Terrace project — LandXML, LiDAR point clouds, elevation grids, GIS files and Google Earth KML — and how to send your design back out as LandXML, Shapefile, GeoJSON or Google Earth KML. You'll be able to start a project from almost any survey or mapping data and hand your work to other civil programs.
Where the imports and exports are
Every import is on the Survey tab, in the Import group: LandXML, GIS Data, Point Cloud and Elevation Grid. Point files and total-station raw files sit in the Points and Survey Data groups beside them; they are covered in Survey and points. The Surfaces tab repeats two of them as From Point Cloud and From Elevation Grid, because both make a surface.

The exports are on the Sheets tab, in the Export group: LandXML, GIS Data, Google Earth and DWG / DXF.

Each button runs a command, so you can also type it on the command line:
| What | Command | Aliases |
|---|---|---|
| Import LandXML | IMPORTLANDXML | LANDXMLIN |
| Export LandXML | EXPORTLANDXML | LANDXMLOUT |
| Import a point cloud (LAS/LAZ) | IMPORTLAS | LASIN |
| Import an elevation grid (GeoTIFF, ASCII grid) | IMPORTDEM | DEMIN |
| Import GIS data (Shapefile, GeoJSON, KML, KMZ) | IMPORTGIS | GISIN |
| Export GIS data (Shapefile, GeoJSON) | EXPORTGIS | GISOUT |
| Export Google Earth (KML, KMZ) | EXPORTKML | KMLOUT |
Typed plainly, an import command asks for the file and then opens its dialog, where you see what's in the file and choose what to bring in. Each import is one undo step: ⌘Z takes the whole import back.
Note If no project is open when you click an import button, Terrace starts a new project first (DPWH, metric) and imports into it.
Importing LandXML
LandXML is the exchange format every civil program speaks: Civil 3D, 12d, InRoads, machine-control systems. Import it when a consultant hands you their survey, surfaces or alignments, or to carry a design over from another program.
- Click Survey ▸ LandXML (or type
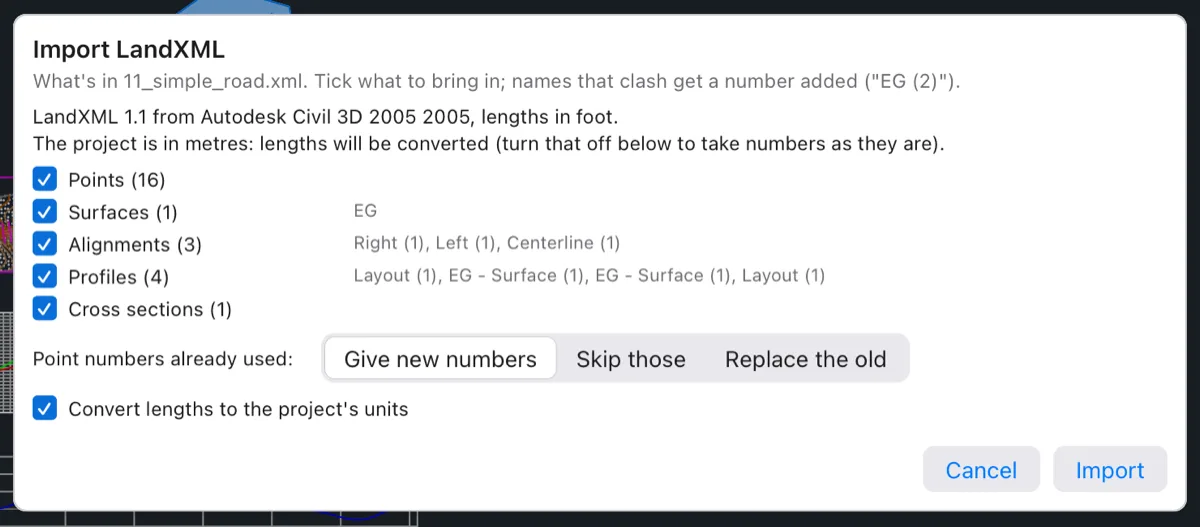
IMPORTLANDXML, aliasLANDXMLIN), and choose the.xmlfile. - Read the summary at the top of the Import LandXML dialog. It says the LandXML version, the program that wrote the file and the file's length unit.
- Tick the kinds of objects you want. Each kind shows how many the file holds and the first few names.
- If the file has points, choose what happens to Point numbers already used.
- Click Import.
What comes in
The dialog lists only the kinds the file holds, from these eight: Points, Point groups, Surfaces, Alignments, Profiles, Cross sections, Pipe networks and Parcels. Untick a kind to leave it out. Surfaces come in with their own triangles, so the TIN is exactly the one the other program made.
When a name is already used in your project, the new object gets a number added: a second surface called EG comes in as "EG (2)". Nothing in your project is renamed or replaced.
Point numbers that clash
Survey point numbers must be unique. When the file's points use numbers your project already has, you choose:
- Give new numbers (the default): the file's points get the next free numbers.
- Skip those: points whose numbers are taken are left out.
- Replace the old: the project's points with those numbers take the file's coordinates, elevation and description.
Units
When the file is in feet and your project in metres (or the other way round), the dialog says so, and Convert lengths to the project's units is ticked: every coordinate, elevation and length is scaled. Untick it only if you know the numbers are already in your units and the file's unit tag is wrong.
The command line then lists what came in, and the conversion used:

Tip Opening a .xml file with File ▸ Open… (⌘O), or dropping it on the window, also runs this import, into the current project (or a new one).
Exporting LandXML
Export LandXML to give your design to another civil program, to a reviewer, or to a contractor's machine-control system.
- Click Sheets ▸ LandXML (or type
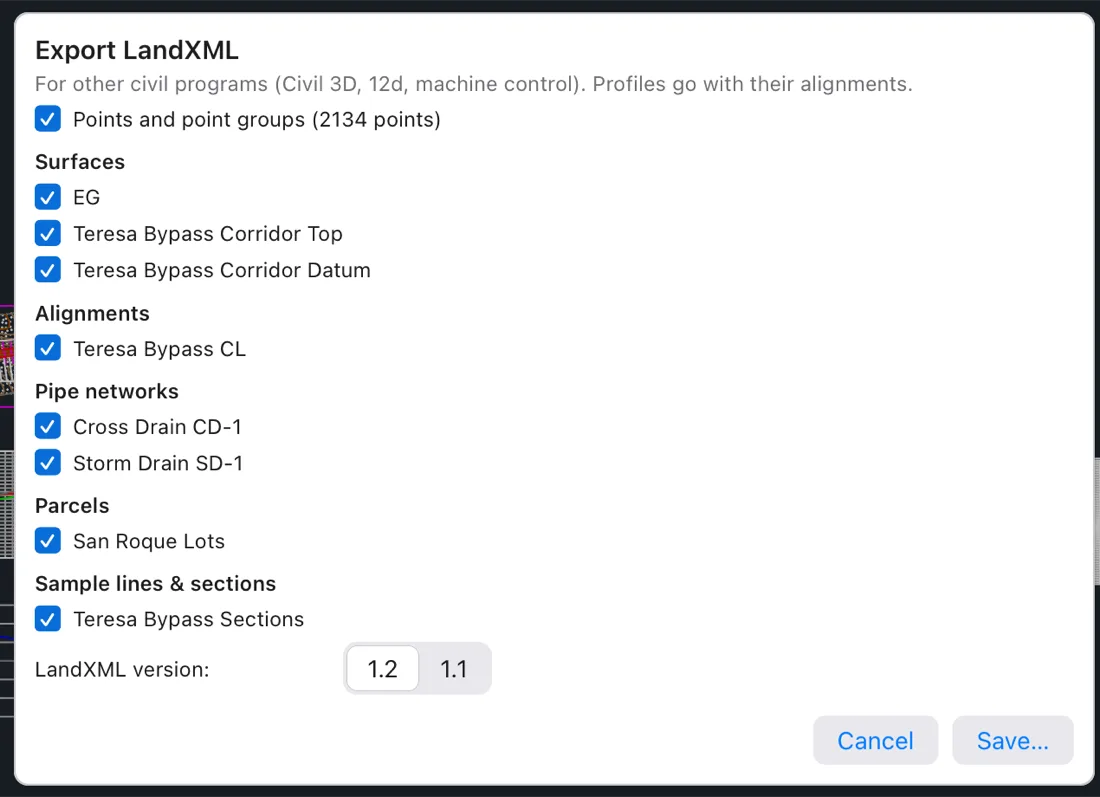
EXPORTLANDXML, aliasLANDXMLOUT). - Untick anything you don't want to send. Every object is ticked at first, listed by kind: Points and point groups, Surfaces, Alignments, Pipe networks (storm, sanitary and pressure), Parcels and Sample lines & sections.
- Choose the LandXML version: 1.2 (the default, read by current programs) or 1.1 for older ones.
- Click Save… and pick the file. Terrace suggests the project's name, such as
Teresa Bypass Road (Sample Project).xml.
Point clouds (LAS and LAZ)
A LiDAR or drone survey gives you a point cloud: millions of points, each with a class saying what it hit — ground, trees, buildings, water. Terrace turns a cloud into a surface. You keep the ground points for a terrain model, and thin them so the surface stays quick to work with.
- Click Survey ▸ Point Cloud or Surfaces ▸ From Point Cloud (command
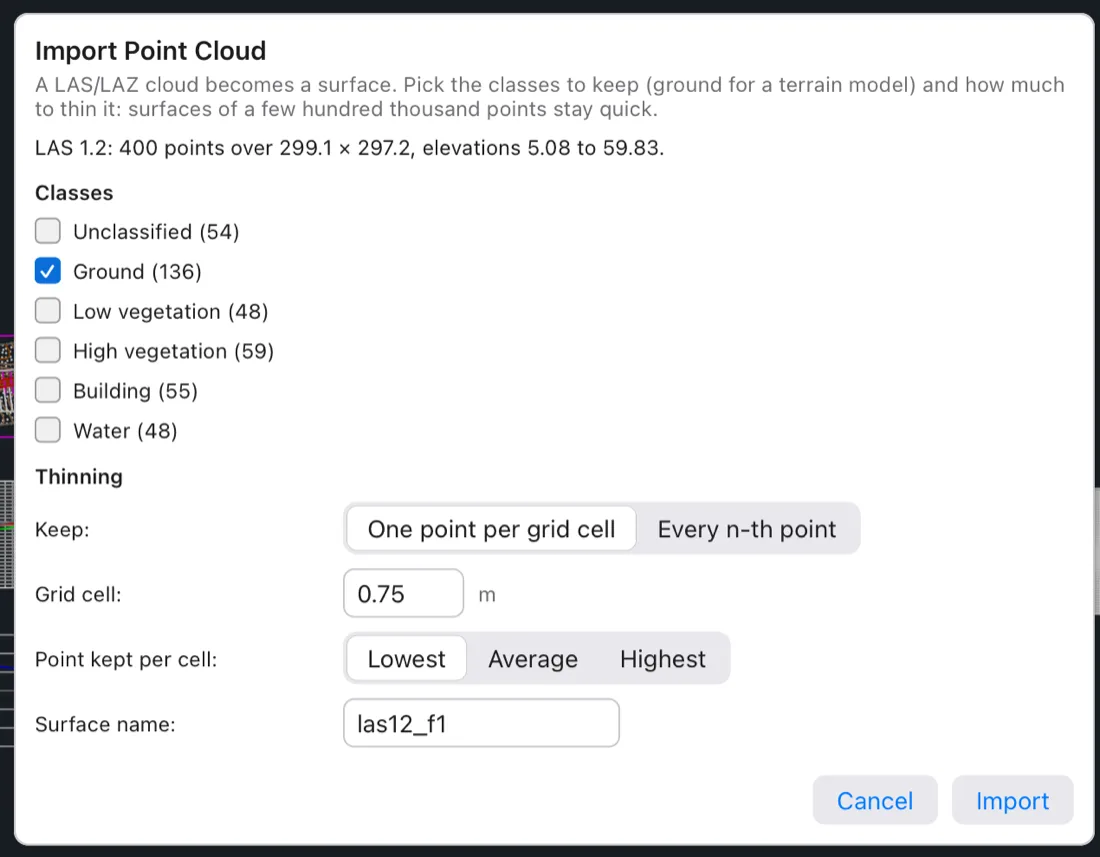
IMPORTLAS, aliasLASIN), and choose a.lasor.lazfile. - Read the summary: the LAS version, the number of points, the area they cover and the lowest and highest elevation. If the file names a coordinate system that differs from the project's, the dialog says so — the points are not transformed.
- Under Classes, tick the classes to keep.
- Under Thinning, choose how many points to keep.
- Check the Surface name (the file's name at first) and click Import.
Classes
Each class found in the file is listed with its standard ASPRS name (Ground, Low/Medium/High vegetation, Building, Noise, Water, Road surface, Bridge deck…) and how many points it has. For a big file (over about 4 MB) the counts come from every 100th point and read "about …".
Terrace ticks Ground alone when the cloud has ground points, because that's what a terrain surface needs. When it has none (an unclassified cloud), every class is ticked except noise.
Thinning
- One point per grid cell (the default) lays a square grid over the cloud and keeps one point per cell. The Grid cell starts at a size that leaves about 150,000 points. Point kept per cell chooses which: Lowest (the default, best for bare ground under grass and brush), Average or Highest.
- Every n-th point keeps every n-th point of the file, as it comes.
The new surface appears in the Project browser under Surfaces, drawn with the standard surface style. If the choices leave fewer than three points, the dialog asks you to tick more classes or thin less.
Elevation grids (GeoTIFF and ASCII grid)
A DEM (digital elevation model) is a grid of elevations, one per cell, like the national IFSAR or SRTM data. Import one when you don't have a field survey yet, for route studies and catchment areas.
- Click Survey ▸ Elevation Grid or Surfaces ▸ From Elevation Grid (command
IMPORTDEM, aliasDEMIN), and choose a GeoTIFF (.tif,.tiff) or Esri ASCII grid (.asc). - Read the summary: columns × rows, the cell size, the lower-left corner, the elevation range and how many cells have no data.
- Set Use every … th cell. Terrace starts with the smallest step that keeps the grid under about 250,000 cells; 1 takes every cell.
- Check the Surface name and click Import.
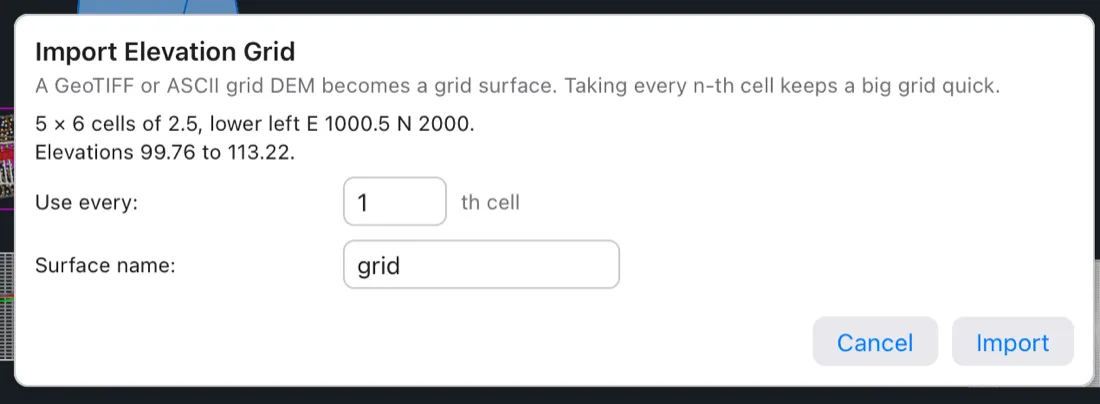
Cells with no data are left as holes in the surface. As with point clouds, a grid in another coordinate system is reported but not transformed.
GIS files (Shapefile, GeoJSON, KML and KMZ)
GIS layers carry things like existing roads, lot lines from the assessor, river banks or spot heights. Import them to start your base map or to bring in linework you'll design against. Lines and places someone traced in Google Earth (KML or KMZ) come in the same way.
- Click Survey ▸ GIS Data (command
IMPORTGIS, aliasGISIN) and choose a Shapefile (.shp, with its.dbfand.prjbeside it) a GeoJSON file (.geojson,.json), or a Google Earth file (.kml, or.kmz, a zipped KML). - Read the summary: the layer's name, how many points, lines and polygons it has, its attribute fields, and its coordinate system.
- Choose what the features become, where elevations come from, and the name.
- Click Import.
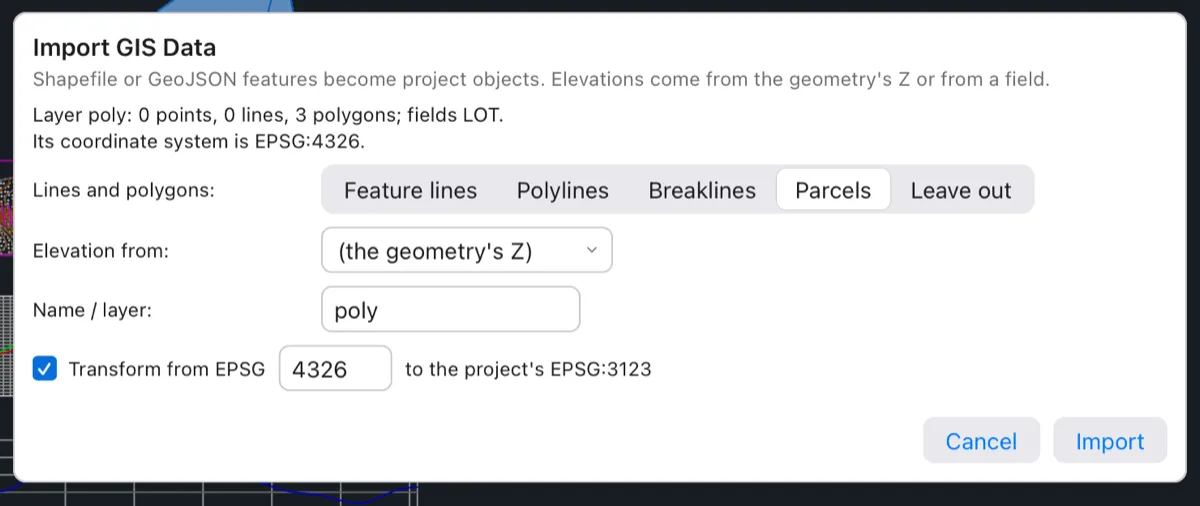
What becomes what
| In the file | Choice | In the project |
|---|---|---|
| Point features | COGO points (default) | Survey points, numbered from the next free number, in a new point group named after the layer. Description from picks the field for their descriptions (a field called desc, description, code or name is chosen for you). |
| Leave out | Nothing. | |
| Lines and polygons | Feature lines (default) | 3D feature lines named "layer 1", "layer 2"… — ready for grading or as corridor targets. |
| Polylines | Ordinary drawing polylines on a layer named Name / layer, at the feature's elevation. | |
| Breaklines | Breaklines added to the surface you pick in Into surface; the surface is rebuilt. | |
| Parcels | Lots in a new parcel site named after the layer (polygons only; the dialog warns when the layer has none). | |
| Leave out | Nothing. |
Elevations
Elevation from is (the geometry's Z) at first, which uses 3D coordinates when the file has them. Pick a field instead when heights are stored as an attribute — contour shapefiles usually have one. Terrace chooses a field called z, elev, elevation, contour or one containing "height" for you.
Coordinate transforms
GIS data is often in a different coordinate system from your design. When your project has one (set it with Survey ▸ Coordinate System, COORDINATESYSTEM, or in Project Settings), the dialog shows Transform from EPSG … to the project's EPSG:…:
- A Shapefile's system is read from its
.prjfile. - GeoJSON is always longitude/latitude (EPSG:4326), as the GeoJSON standard says.
- KML and KMZ are always WGS 84 longitude/latitude (EPSG:4326), as Google Earth writes them.
- The box is ticked when both systems are known and differ. You can type another EPSG code if the file's is missing or wrong.
When the project has no coordinate system, coordinates come in as they are, and the summary says so.
KML and KMZ
A KML file's folders are read together as one layer named after the file. Its placemarks' points, paths and polygons are the layer's points, lines and polygons, and their name, description and extended data become fields. The choices are the same as for any GIS file:
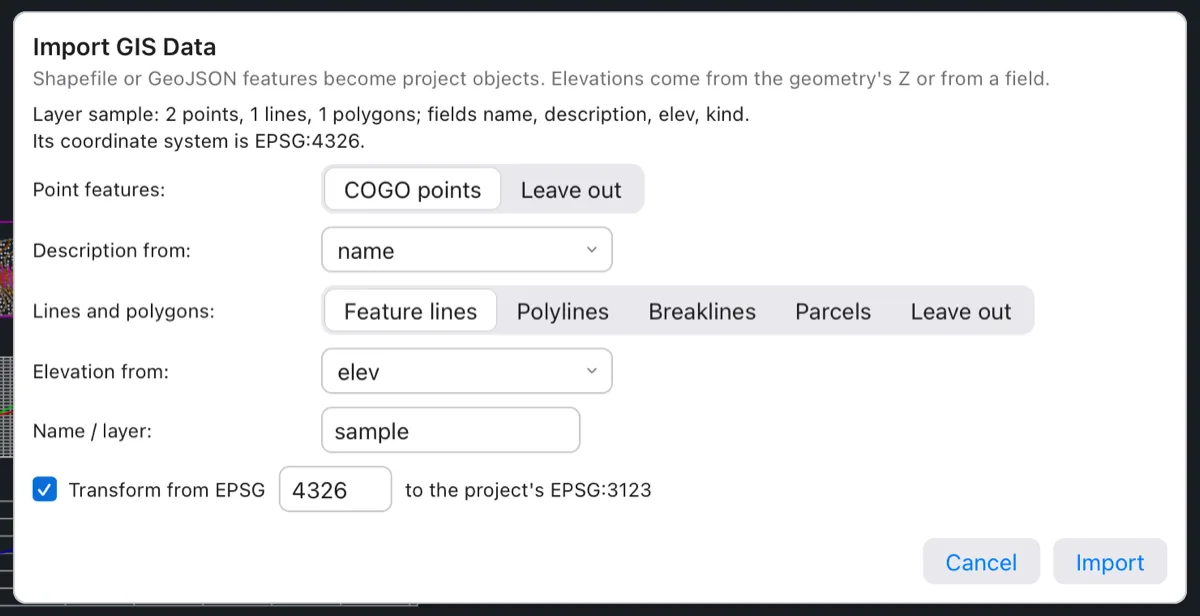
Terrace picks name for the points' descriptions and an elevation field (here elev) when the file has one; otherwise heights come from the coordinates' altitude. Each ring of a polygon (its outline and any holes) becomes a feature line of its own, so this file, with one path and a multi-part polygon of three rings, gives “Imported 2 points (group sample), 4 feature lines.”
Google Earth (KML and KMZ)
A KML or KMZ file opens in Google Earth, so anyone can see your road on the satellite picture without Terrace.
- Make sure the project has a coordinate system (Survey ▸ Coordinate System). Without one Terrace can't place the design on the globe, and the command stops with "KML needs the project's coordinate system".
- Click Sheets ▸ Google Earth (or type
EXPORTKML, aliasKMLOUT). - Type the file name on the command line, ending in
.kmlor.kmz(a zipped KML, smaller), and press Enter.

The file holds a folder for each kind the project has — points, parcels, alignments, feature lines, pipes and catchments — with their names and main values as attributes.
To bring KML or KMZ in, use Survey ▸ GIS Data (see KML and KMZ above).
Exporting GIS data
Send your parcels to the assessor's GIS, or your alignment and drainage to a planning office, as a Shapefile or GeoJSON.
- Click Sheets ▸ GIS Data (or type
EXPORTGIS, aliasGISOUT). - Type the file name, ending in
.shpor.geojson, and press Enter. - Choose what to export:
Points,PArcels(the default),Alignments,Feature lines,PIpesorCatchments. Type the capital letters (PA,PI…) or click the choice.
One kind goes in each file, with useful attributes: points carry number, description and elevation; parcels their site, number, name, kind and area; alignments name and length; pipes network, name, part and both inverts; catchments name, runoff coefficient C and area in hectares.
- Shapefile: Terrace writes the
.shp,.shxand.dbf, plus a.prjwith the project's coordinate system when it has one. - GeoJSON: coordinates are turned into longitude/latitude when the project has a coordinate system, as GeoJSON expects.
Point files (EXPORTPOINTS) are covered in Survey and points.
Drag and drop
The quickest way to import is to drag a file from Finder onto the Terrace window. Terrace looks at the file's extension:
| Dropped file | What happens |
|---|---|
.xml | The LandXML import dialog. |
.csv, .txt, .pnt, .nez, .pnezd, .xyz | The point file import dialog. |
.rw5, .sdr, .gsi | The raw survey data import dialog. |
.las, .laz | The point cloud import dialog. |
.tif, .tiff, .asc | The elevation grid import dialog. |
.shp, .geojson, .json, .kml, .kmz | The GIS import dialog. |
.terrace, .dwg, .dxf | Opens the project or drawing in a new tab. |
.png, .jpg | Attaches the image to the drawing. |
.scr | Runs the script file in the drawing. |
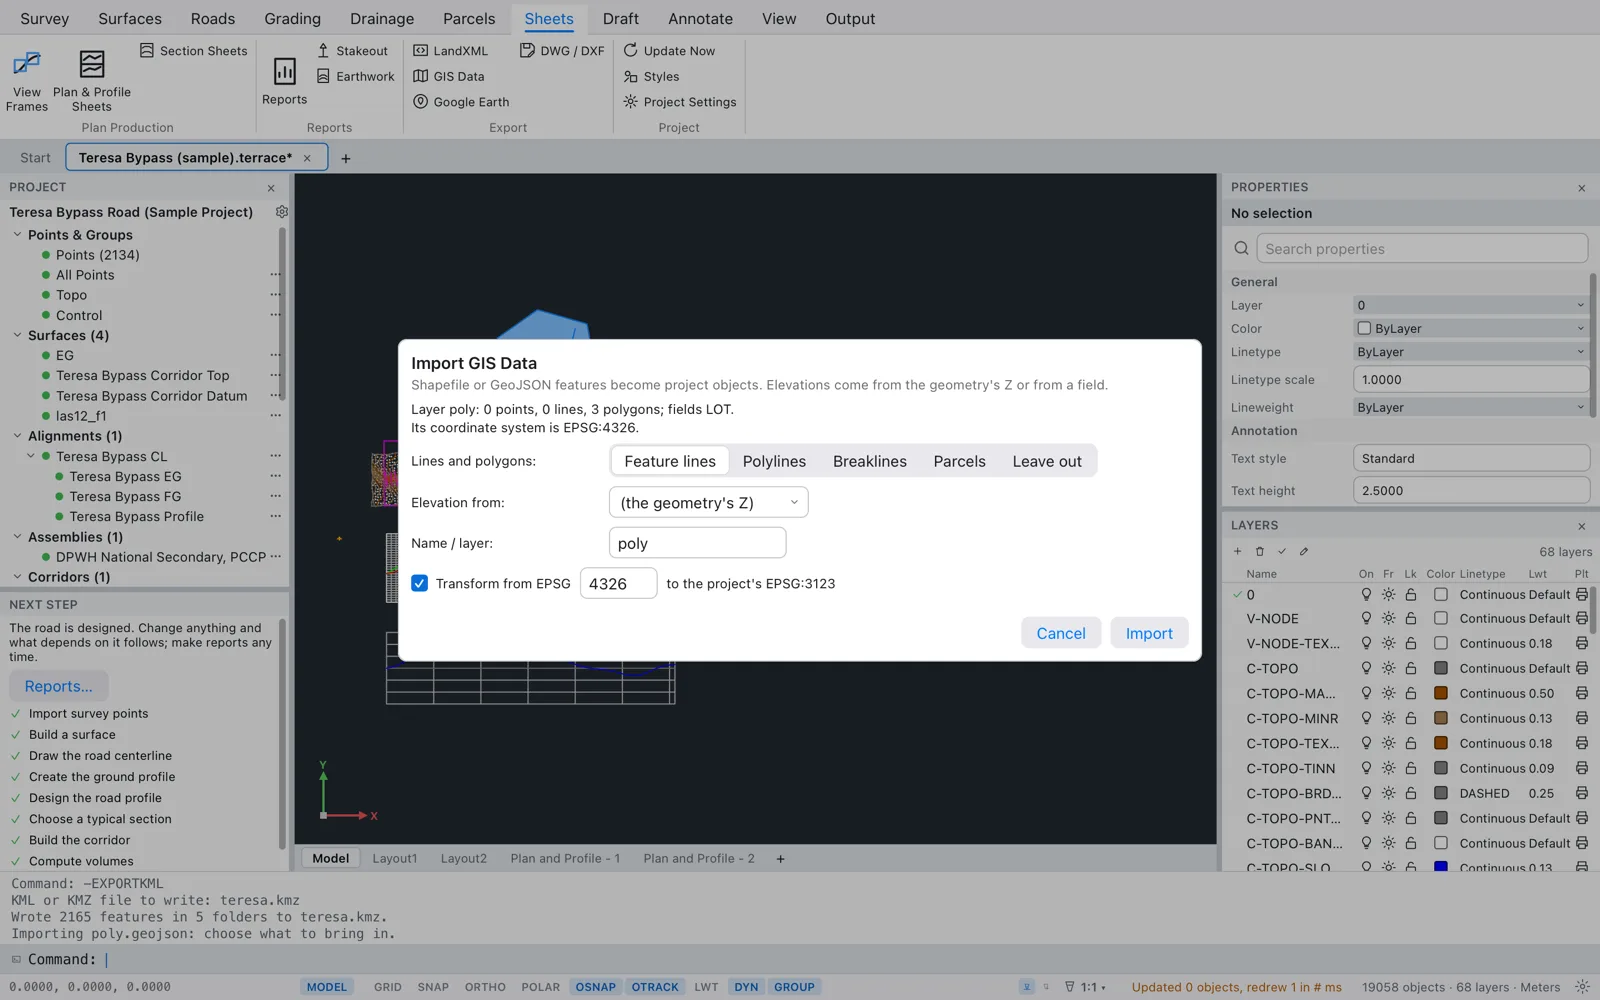
The file goes into the project you're looking at; if the current tab isn't a project, a new project is made for it. The command line says "Importing file: choose what to bring in."
A raw survey file saved as .csv or .txt opens the point file dialog when dropped; use Survey ▸ Import Raw File for those. Any other file shows “Terrace opens .terrace projects, LandXML (.xml), .dwg and .dxf files”.
Command-line imports (-IMPORTLANDXML and friends)
Every import and export also has a dash form, as in AutoCAD: -IMPORTLANDXML, -IMPORTPOINTS, -IMPORTRAW, -IMPORTGIS, -IMPORTLAS, -IMPORTDEM, -EXPORTLANDXML, -EXPORTPOINTS, -EXPORTGIS and -EXPORTKML. They ask everything on the command line, with no dialog, so they fit scripts (.scr files) and quick repeat jobs. Type the file's path at the first prompt; Enter alone at any prompt takes the default shown in <angle brackets>.
| Command | Prompts after the file | What it does |
|---|---|---|
-IMPORTLANDXML | none | Imports everything in the file, with clashing point numbers renumbered. |
-IMPORTPOINTS | Column order [Auto/PNEZD/PENZD/PNEZ/PENZ/NEZ/ENZ] <PNEZD> | Adds the points in the column order you pick. (Picking Auto currently fails with “the column order "A" has "A"”; pick an order, or use the dialog, which detects it.) |
-IMPORTRAW | none | Reads RW5, SDR, GSI or raw CSV (by extension) and reduces the observations to points. |
-IMPORTGIS | Attribute holding elevations <geometry Z> | Reads Shapefile, GeoJSON, KML or KMZ. Points become COGO points; lines and polygons become polylines on a layer GIS-LAYERNAME, keeping the attributes. Coordinates are transformed when both systems are known. |
-IMPORTLAS | Ground points only (class 2)? [Yes/No] <Yes>, then Thin to one point per grid cell of (0 = keep all) <1.00> | Makes a surface named after the file, keeping the lowest point per cell. With no ground-classified points it uses every point and says so. The cell you type is remembered for next time. |
-IMPORTDEM | none | Makes a grid surface from every cell. |
-EXPORTLANDXML | none | Writes every object as LandXML 1.2. |

-IMPORTLAS: ground points only, thinned to one per 2 m cell. The last line tells how many points made the surface.EXPORTPOINTS, EXPORTGIS and EXPORTKML have no dialog, so their plain and dash forms work the same.
DWG and DXF
Terrace opens DWG and DXF drawings, and Sheets ▸ DWG / DXF (or Output ▸ Save As) saves your project as a plain drawing for anyone with a CAD program. The civil objects go out as their drawn lines, text and hatches — what you see — not as intelligent objects; use LandXML for those. See Projects and files for the details.